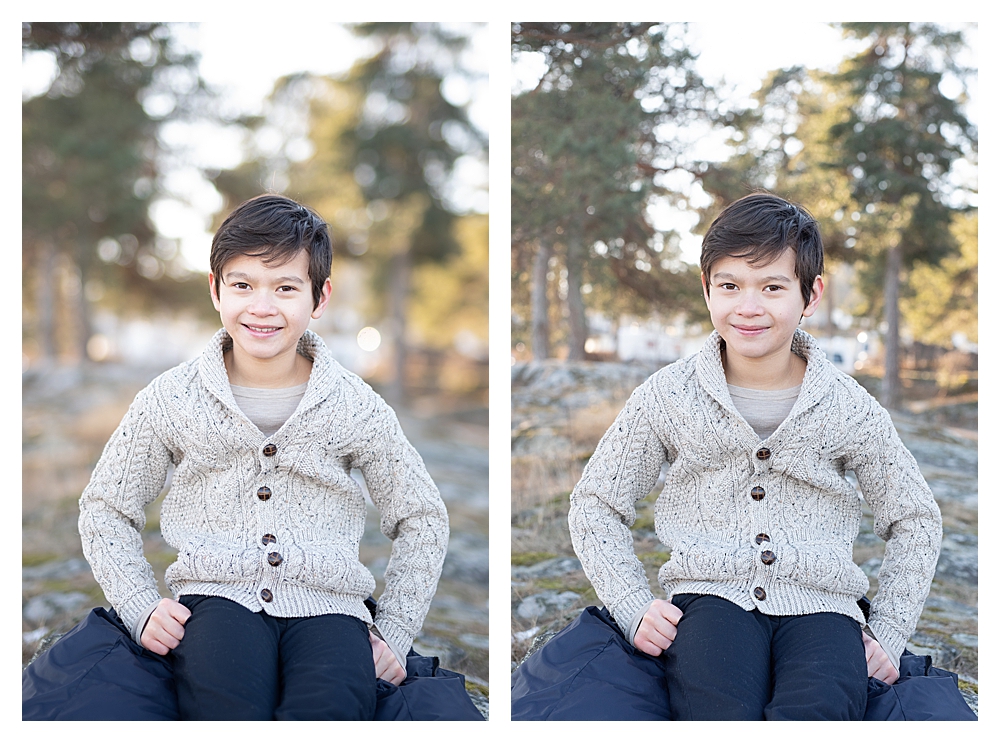
What you’ll learn: Aperature basics and a comparison how a picture changes with an aperature from 1.4 to 4.0.
Have you sometimes wondered what kind of difference the aperature setting makes in a concrete image?
If you are new to shooting manual, aperature (or f-stop, these words can be used interchably) decides how much of your image will be in focus and how blurry your background will be. Having your subject stand out from a blurry background is often the first thing that makes an image appear professional. Generally, the lower your aperature/f-stop, the more blurry the background will be – or the more “bokeh” you will get. The higher your aperature/f-stop, the more of your picture will be in focus.
The challenge with a low aperature/f-stop is that it can be difficult to make sure that everything that you WANT to be in focus, actually IS. Some lenses can go as low as an aperature/f-stop of 1.2. This means that there is only a very small part of your image that is in focus – you have a so-called “shallow depth of field”.
I love to shoot with a f-stop as low as possible because I usually want as much bokeh as possible in the background of my subject. That is part of my style of photography.
The impact your aperature/f-stop setting has, dependends on how far away you are from your subject, and also how far your subject is away from the background.
If you take a picture of someone, and you want a more blurry background, you can do three things, or a combination of them.
- Move yourself and your camera closer to your subject.
- Move your subject further away from the background.
- Lower your f-stop.
In the examples I am going to show you below, both my subject and I stayed put where we were. The differences in depth of field and bokeh you see, are purely the result of the changed aperature/f-stop.
Let’s have a look

Observations
- The most obvious change is how light/dark the picture is. The higher your aperature/f-stop, the darker the image gets. The reason for that is that the camera lets in more light with a low aperature/f-stop, thus making the image lighter. It lets in less light with a high aperature/f-stop, thus making the image darker. (This can be balanced out with shutter speed and ISO, which I write about here: xyz)
- The trees in the background are coming more and more into focus, the higher the aperature/f-stop gets. This shows you very nicely how your depth of field is increasing with your aperature/f-stop. More of the image is in focus the higher your aperature/f-stop is.
- The last thing, which I personally find very important, is the way skin tones change with a higher aperature/f-stop. This is best seen in the following two pictures. For the purpose of this comparison, I edited the exposure of the first and the last image to be about the same. The one on the left is taken with an aperature/f-stop of 1.4, the one on the right with an aperature/f-stop of 4.0.

You can see how the skin tone changes from being smooth and creamy to a little more rough. This might seem like a small and neglectable thing at first, but will become more important later on. For me, even and smooth skin tones are one of the most important aspects when editing sessions for my clients. The right light and a low aperature/f-stop are most important for achieving good skin tones.
If you enjoyed this post and feel you learned something, you might also be interested in these posts:
Shutter Speed
ISO